There are times when projects don’t begin from scratch. Some begin with a found object that needs a touch up, re-purposing or a make-over. This Before & After series will highlight such projects.
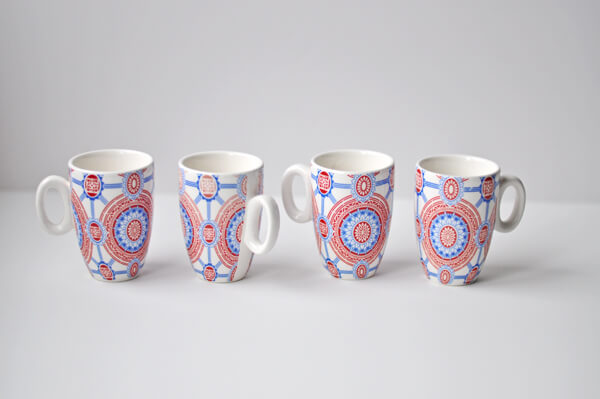
Rarely do I go into stores that have lots of breakable items with my children in tow. It’s just not fun for me. However, sometimes it’s the only alternative. And sometimes it’s better than I expected. On one particular trip, I was looking for small dishes. I usually begin in the clearance section and that is where Love Bug spotted these little cups. I think they are espresso cups. She adores little things thus began the petitioning.
I loved their shape and itty-bitty-ness as well but since they weren’t what I was looking for, I don’t drink espresso and they happened to have a pattern I did not care for (see below), I wasn’t very inclined. But I bought them anyway. I thought, in the least, Bug would enjoy pretending with them. And bonus, when they were rung up at the register, they were $.88 a piece. Not too shabby.
Then I started thinking….with a little work, I could probably make them less unattractive. And so I did. We started off with just four but then on a separate trip with only Sweet J, he was manning the cart, saw and recognized the cups and scooped up the last three. I didn’t fight him. I like how he thinks.
This is what the cups looked like before.
I made them over using:
-Martha Stewart’s line of paints
-paint brush and stipple
If you aren’t aware, Martha’s line of paints can be cured to a permanent finish on many a surface, including these mugs. Before painting them, I thoroughly washed and dried the mugs to remove any and all gunk and grease from the surface. Then I used both a satin white (Wedding Cake) and a satin gray (Arrowhead) to cover the outer surface with a even coat. The white needed a two layers because of the bold colored print.
After the base coat dried, I used a stipple and paint brush to create the designs. (Additionally, I added a dot/line or two of silver to the design.)
Then I followed the directions for curing the paint which is as follows:
Allow the paint to completely dry, at least an hour. Then place the item or items in a cool oven. I place my pieces on a parchment-lined baking sheet. Turn the oven to 350F and bake the wares for 30 minutes. After 30 minutes, turn off the oven and allow the item or items to cool in the oven. This is the method because glass must be heated gradually.
When they are completely cooled, remove them from the oven and do not use for 72 hours. The paint will also cure after 21 days, without using the oven. Both methods produce top-shelf dishwasher safe cured pieces.
I think them much improved, yes? Maybe I’ll take up drinking espresso now.
I take that back. I won’t. But I wouldn’t say no to hot chocolate.


How cute! I especially love the polka dot ones.
These are great! I have a porcelain pen that works on mugs but didnt realize the Martha pens worked too fun!
Hi love your diy ! Did u use the multi surface acrylic paints ? Or is there any other line of paint you suggest . I am also new to your blog and love it !!!
I did use the multi-surface Martha Stewart line of acrylics. Thank you for your kind words and welcome!!
Can you use any paint on coffee mugs to paint designs on them?
I used Martha Stewart paint because it can be cured in the oven. Regular paint, that cannot be oven-cured, would just wash off. Hope that helps!
Can the oven cured method be used for mason jars or wine glasses?
Did you have to do multiple coats to get it completely covered with the Martha Stewart paints? If so, what was your wait time (or oven time) between coats?
How did you make the paint that smooth?? When I tried doing it the paintbrush strokes were very onvious
I have some dishes that have an old fashioned pattern on them. I gave them to my daughter, she’s now moving out and wants to repainted them, and then use them to eat off of. Can we use this oven method, or do you have any ideas how we can do this? The dishes are Caleca, hand painted, made in Italy. Bought at Macy’s. Any information you can give us would be appreciated. Thank you!
I cant believe the transformation on these little cups, i also didn’t know it was possible to permanently repaint crokery, i’m guessing its also possible with plates and bowls. My head is now spinning with ideas. These are really brilliant. Like you i dont drink espresso (or any coffee) but would definitely make these, they are a good excuse for a strong shot of hot chocolate.